


Whittling Projects You Can Do At Home
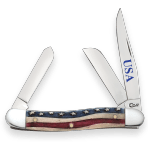
Featured Knife: Case Seahorse Whittler.
This type of carving has many names, from the bearded man, wood spirit, self-portrait (for the bearded carver) to Santa Claus, and wizard carving. Whichever title you choose, the basic format, layout and execution will be the same.
For this carving, we will focus on the key aspects of the carving, allowing you to expand as you see fit.
1. Initial Layout

Where you place the nose will be decided on how large of a hat you want to place on the figure or if you want it wearing a hat at all. For this project we will have the figure wear a stocking cap. The top of the head will only be slightly higher than the top of the head. Mark where the eyes would be just below the brow, and then mark down to where you want the tip of the nose.
2. Nose Placement and First Cuts

Your first cut will be a stop cut where the eyes are marked. Follow this up with a slicing cut from the tip of the nose to the base of the stop cut you just placed. Once the bridge of the nose is established, rough out the portion above the eyes to create the brow.
The upper line is where the eyes will be and the lower is the tip of the nose.
This cut runs from the tip of the nose to the stop cut.
Remove the material above the brow.
3. Establishing Cheeks and Eyes

With the brow established we can move back to the eyes placing two stop cuts, one on either side of the bridge of the nose. It may be useful to draw a line from the tip of the nose to the base as a guide. Follow the stop cuts up with slicing cuts beginning at the tip of the nose towards the eye. This will start to give us contour as we continue.
Let your hands work together. The right hand holds the knife while the left holds the carving, and the left thumb pushes the blade.
You will also find it easier to make stop cuts on half of the face by turning it over (the anatomical right side as you are looking at it).
4. Base of Nose and Upper Lip

Now put a stop cut just under the tip of the nose with a slicing cut from just below to create the upper lip. To establish the nostrils, we will do two stop cuts following them up with a slicing cut (reference the photo). At this point you may have noticed that the face appears to be a series of triangles, thinking about how the parts of the face meet.
5. Beard and Hat Lines

When deciding where to place the beard and hat lines it is dealers' choice. You can follow the illustration I have provided, or you can go your own way. Just remember to do score lines on the areas you draw. The follow up cuts will be determined by which area needs to stand out more. For example, you will do a score line on the base of the mustache, and the cuts that follow will go up and into those score lines.
Above I am drawing where the head would be to help decide where the top of the hat will go.
If you want to challenge yourself you can carve the ears, but it doesn’t matter because you won't see them.
6. Roughing the Beard Shape

Before we add texture to the beard, we need to decide how we want it to look. Take a moment to look at the progress of the piece and choose a shape that compliments and flows with the carving.
Look at the overall flow of the sketch and carving. We are trying to avoid straight lines. We want the figure to have some personality from every angle.
7. “To add texture or not to add texture, that is the question...”

If the wood grain has s unique quality, I would leave the natural surface as is. With this piece being in basswood, I think that adding the texture will enhance the carving. With that in mind we will switch from the larger Wharncliffe blade of the Seahorse Whittler to the smaller coping blade to take advantage of the point at the end. Using the point of the coping blade made a score line in the beard following the wood grain. This can be a short cut or long the decision is yours, but follow the score cut up with a secondary cut to the side of the first cut.
8. Finishing and Final Thoughts

My thoughts on finishing are similar to deciding whether or not I add texture to the beard. It all depends on the characteristics of the wood. For this carving, I liked the way the grain looked, so I went against my normal approach and finished the piece with linseed oil. It also might have a little to do with the fact that I love carving and only tolerate painting.
You do what you want with the carving and once your finished if you like it so much that you do not want to give it away or sell it, then I would consider that a success.
Video Tutorials
You can find other tutorials here: https://www.youtube.com/@thesmokedeck
Download The PDF
Get the document version of this tutorial. Click here to download the file.
About the Craftsman
Brian McKinney is a self-taught carver from Virginia with his wife, four children, two dogs, and very soon some baby goats. For more examples of his work, you can find him on Instagram @McCarvings and on YouTube under the channel name TheCarver.
